> ## Documentation Index
> Fetch the complete documentation index at: https://docs.uservox.ai/llms.txt
> Use this file to discover all available pages before exploring further.
# Create and Edit Process
> A Process in UserVox defines how your voice agent executes calls including which agent handles them, how calls are scheduled or retried, what happens on each disposition, and how input data is transformed before use. This guide walks you through each step of setting up a process.
## **1. Adding an Agent to the Process**
Each process begins by assigning a **Voice Agent**.\
The agent defines the voice, script, and logic that will be used for every call in this process.
**Steps:**
1. Go to **Processes → Duplicate Existing Process**.
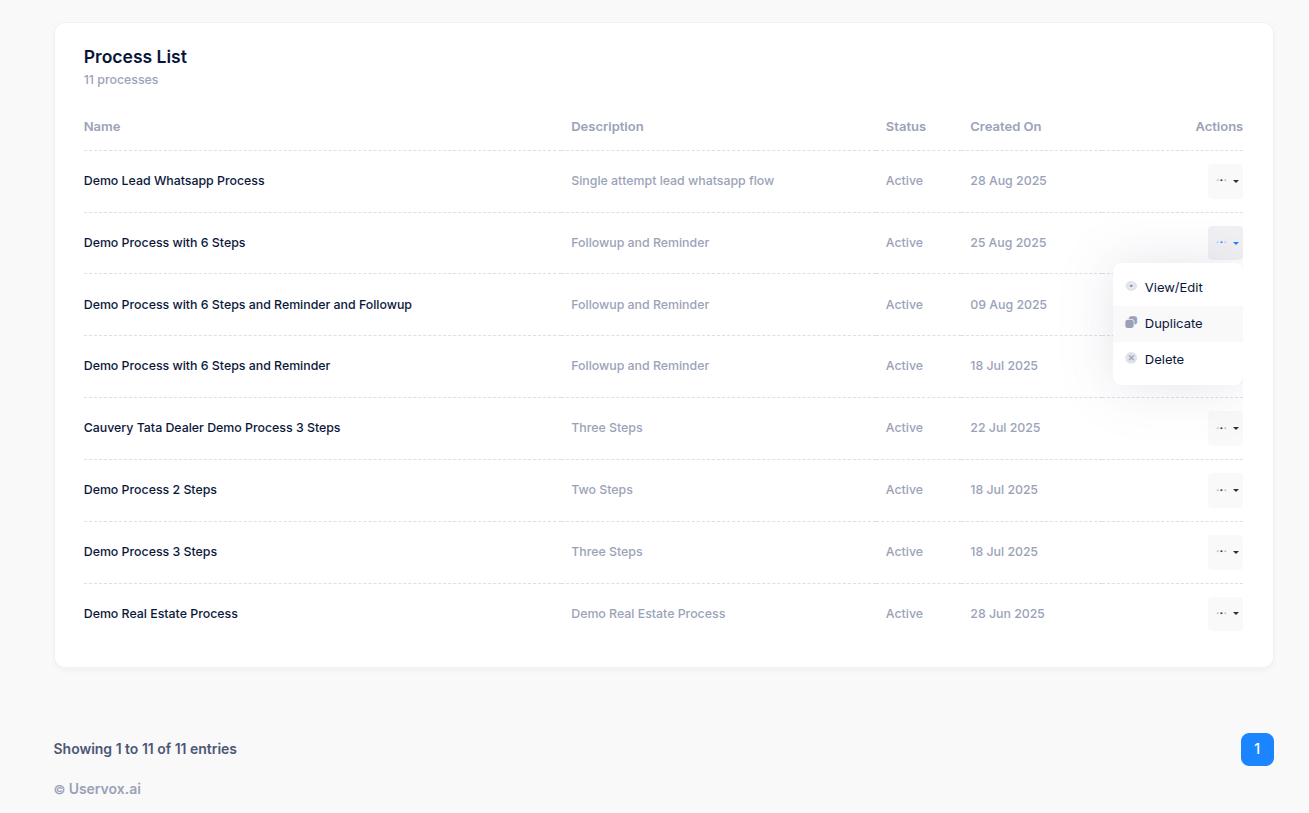 2. Enter a process name and description.
3. Under **Agent**, select the desired **voice agent** from the dropdown.\
*(Example: Process 4 steps, Process 6 steps, etc depending on your campaign.)*
2. Enter a process name and description.
3. Under **Agent**, select the desired **voice agent** from the dropdown.\
*(Example: Process 4 steps, Process 6 steps, etc depending on your campaign.)*
 > 💡 *Tip: Use different agents for different workflows — e.g., loan follow-ups, lead verification, or renewal reminders.*
***
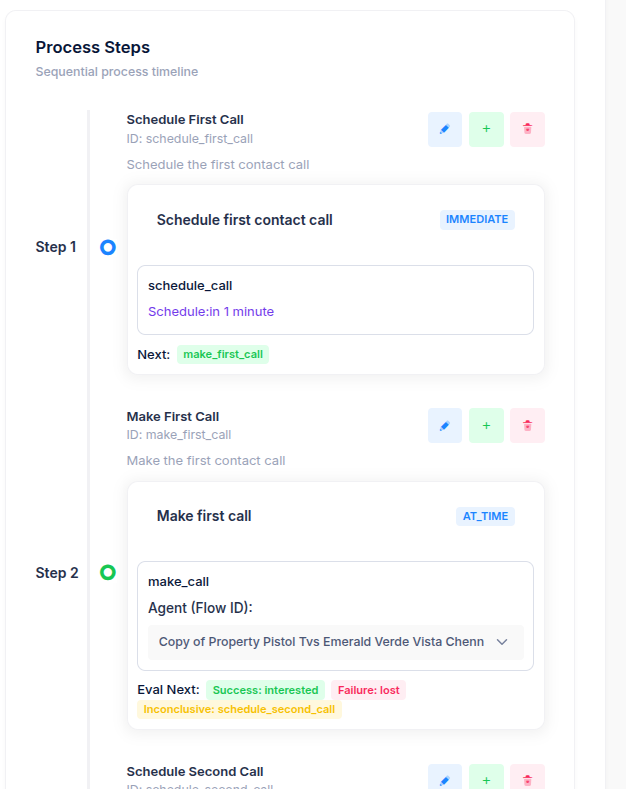
## **2. Scheduling Calls**
UserVox gives you flexibility to schedule follow-up calls in two ways:
* Using **Calling Windows**, or
* Using **AI Instructions** (based on what the customer says).
### **a. Scheduling with Calling Windows**
Calling windows define when a call can be placed — for example, only during business hours.
**Example:**
* Call Type: `second_contact`
* Window: `Next available window`
You can also define **Window on Disposition** — different schedules depending on the call outcome.\
*(Refer to Screenshot 1)*
| Disposition | Window |
| :---------------------- | :------------ |
| Working with Competitor | Next Week |
| No Reason Shared | 2 Weeks Later |
**Steps:**
1. Under **Action**, select **Schedule Call**.
2. Choose a `callType` such as `first_contact`, `second_contact`, or `follow_up`.
3. Set the **window** (e.g., “Next available window”).
4. Under **windowOnDisposition**, define follow-up timings based on specific dispositions.
* Example: “Working with Competitor → Next Week.”
* Example: “No Reason Shared → 2 Weeks Later.”
5. Click **Add** to include additional disposition rules.
> 💡 *Tip: Use different agents for different workflows — e.g., loan follow-ups, lead verification, or renewal reminders.*
***
## **2. Scheduling Calls**
UserVox gives you flexibility to schedule follow-up calls in two ways:
* Using **Calling Windows**, or
* Using **AI Instructions** (based on what the customer says).
### **a. Scheduling with Calling Windows**
Calling windows define when a call can be placed — for example, only during business hours.
**Example:**
* Call Type: `second_contact`
* Window: `Next available window`
You can also define **Window on Disposition** — different schedules depending on the call outcome.\
*(Refer to Screenshot 1)*
| Disposition | Window |
| :---------------------- | :------------ |
| Working with Competitor | Next Week |
| No Reason Shared | 2 Weeks Later |
**Steps:**
1. Under **Action**, select **Schedule Call**.
2. Choose a `callType` such as `first_contact`, `second_contact`, or `follow_up`.
3. Set the **window** (e.g., “Next available window”).
4. Under **windowOnDisposition**, define follow-up timings based on specific dispositions.
* Example: “Working with Competitor → Next Week.”
* Example: “No Reason Shared → 2 Weeks Later.”
5. Click **Add** to include additional disposition rules.
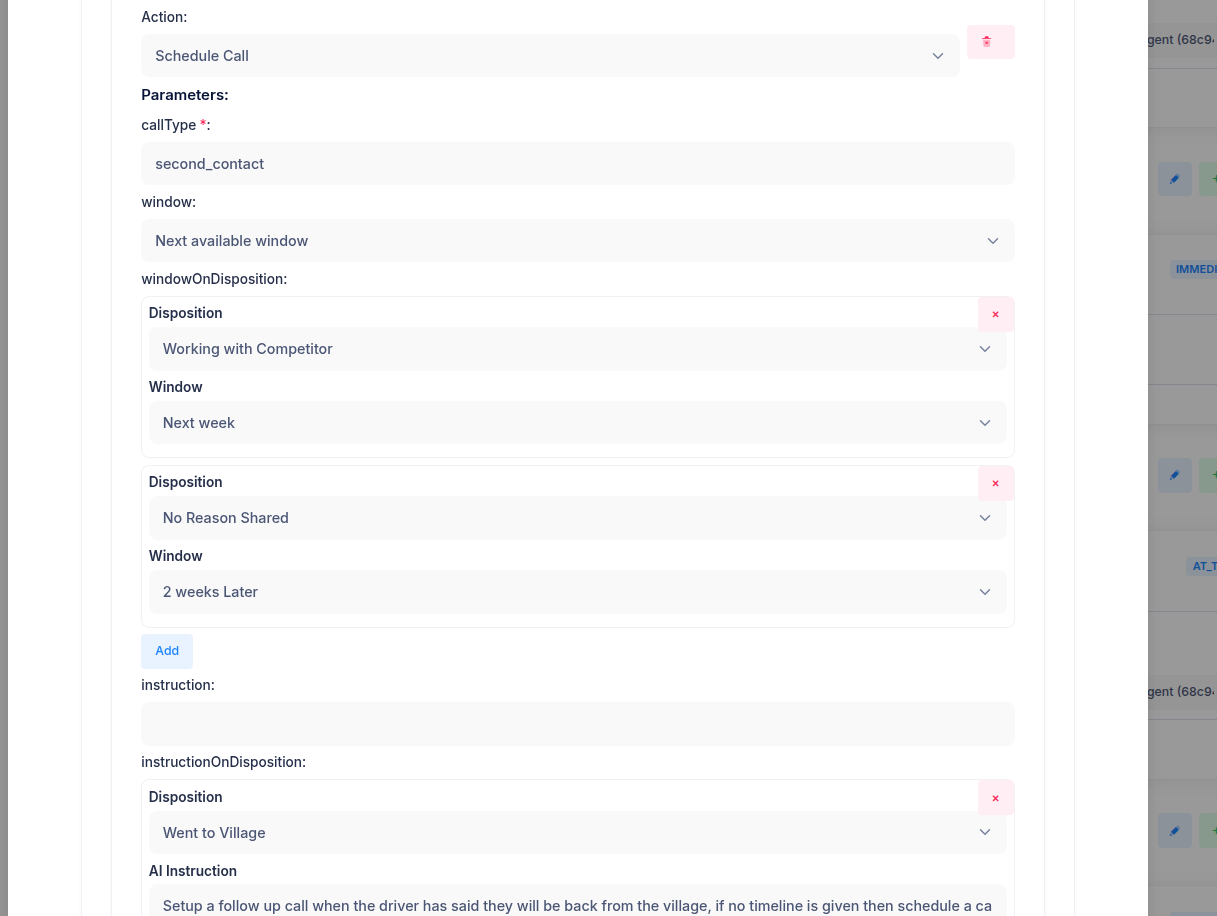 ***
### **b. Scheduling Using Instructions**
When you want the AI to schedule follow-ups dynamically based on what the user says — for example, “I’ll be back from my village next week” — use **AI Instructions**.\
*(Refer to Screenshot 1 — bottom section)*
**Steps:**
1. Under **instructionOnDisposition**, select a disposition (e.g., *Went to Village*).
2. Add a natural-language instruction such as:
> “Setup a follow-up call when the driver has said they will be back from the village; if no timeline is given, then schedule a call after 7 days.”
This allows UserVox to automatically pick up user intent and reat
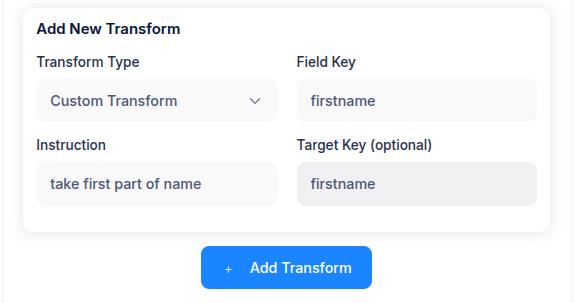
## **3. Adding Transformations**
Transformations help you clean, adjust, or rename input fields before sending them to the voice agent.\
*(Refer to Screenshot 3)*
**Example Use Case:**\
If your incoming data includes full names but your agent script only needs the first name.
**Steps:**
1. Click **Add Transform**.
2. Choose the **Transform Type** (e.g., *Custom Transform*).
3. Enter the **Field Key** — e.g., `firstname`.
4. Add an **Instruction** — e.g., *“take first part of name”*.
5. Optionally, specify a **Target Key** (output field).
6. Click **Add Transform** to save.
***
### **b. Scheduling Using Instructions**
When you want the AI to schedule follow-ups dynamically based on what the user says — for example, “I’ll be back from my village next week” — use **AI Instructions**.\
*(Refer to Screenshot 1 — bottom section)*
**Steps:**
1. Under **instructionOnDisposition**, select a disposition (e.g., *Went to Village*).
2. Add a natural-language instruction such as:
> “Setup a follow-up call when the driver has said they will be back from the village; if no timeline is given, then schedule a call after 7 days.”
This allows UserVox to automatically pick up user intent and reat
## **3. Adding Transformations**
Transformations help you clean, adjust, or rename input fields before sending them to the voice agent.\
*(Refer to Screenshot 3)*
**Example Use Case:**\
If your incoming data includes full names but your agent script only needs the first name.
**Steps:**
1. Click **Add Transform**.
2. Choose the **Transform Type** (e.g., *Custom Transform*).
3. Enter the **Field Key** — e.g., `firstname`.
4. Add an **Instruction** — e.g., *“take first part of name”*.
5. Optionally, specify a **Target Key** (output field).
6. Click **Add Transform** to save.
 ***
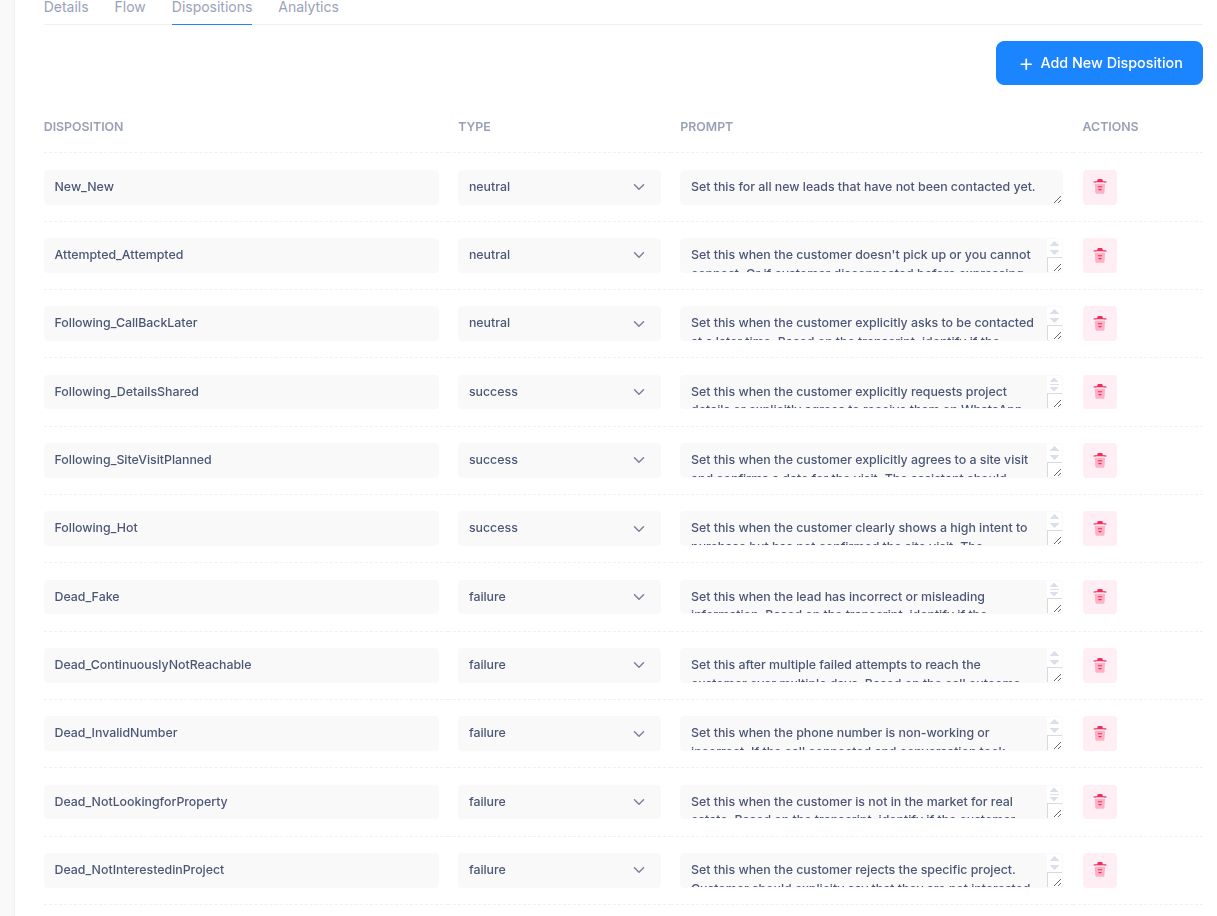
## **4. Setting Dispositions**
Dispositions capture the outcome of each call and trigger what happens next.\
*(Refer to Screenshot 2)*
Each disposition can be tagged as:
* **Success** (e.g., *SiteVisitPlanned*, *Hot*)
* **Failure** (e.g., *InvalidNumber*, *NotInterested*)
* **Neutral** (e.g., *CallBackLater*, *Attempted*)
**Steps:**
1. Navigate to the **Dispositions** tab in your process.
2. Click **Add New Disposition**.
3. Enter a **Name**, select a **Type**, and write a **Prompt** that defines when this status should be used.
4. Save the disposition.
***
## **4. Setting Dispositions**
Dispositions capture the outcome of each call and trigger what happens next.\
*(Refer to Screenshot 2)*
Each disposition can be tagged as:
* **Success** (e.g., *SiteVisitPlanned*, *Hot*)
* **Failure** (e.g., *InvalidNumber*, *NotInterested*)
* **Neutral** (e.g., *CallBackLater*, *Attempted*)
**Steps:**
1. Navigate to the **Dispositions** tab in your process.
2. Click **Add New Disposition**.
3. Enter a **Name**, select a **Type**, and write a **Prompt** that defines when this status should be used.
4. Save the disposition.
 > 📊 *Dispositions feed into reporting and re-calling logic — so make sure each scenario (success, failure, neutral) is well-defined.*
***
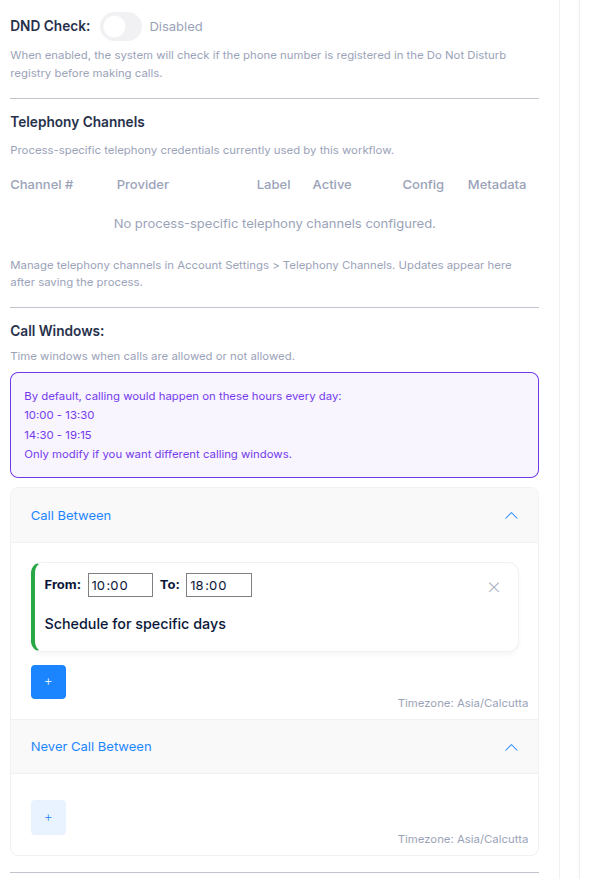
## **5. Defining Calling Windows**
To ensure compliance and optimize reach rates, define calling windows (the time periods when calls are allowed).
**Steps:**
1. Go to **Calling Windows** section.
2. Set preferred start and end times (e.g., 10:00 AM – 7:00 PM).
3. Choose active days (e.g., Monday to Saturday).
4. Optionally, assign specific windows to follow-ups or retries.tempt calls intelligently.
> 📊 *Dispositions feed into reporting and re-calling logic — so make sure each scenario (success, failure, neutral) is well-defined.*
***
## **5. Defining Calling Windows**
To ensure compliance and optimize reach rates, define calling windows (the time periods when calls are allowed).
**Steps:**
1. Go to **Calling Windows** section.
2. Set preferred start and end times (e.g., 10:00 AM – 7:00 PM).
3. Choose active days (e.g., Monday to Saturday).
4. Optionally, assign specific windows to follow-ups or retries.tempt calls intelligently.